Tuesday, September 30, 2008
Space Dust...
Monday, September 29, 2008
Masking Tape & Weathering
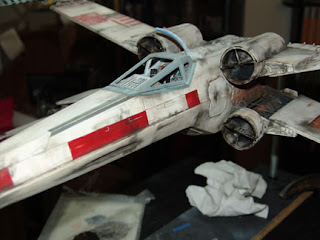
Now it's on to the serious weathering, but before I start I coat the whole model with dull coat. I really like Testor's dull coat because it dries fast and has an even flat look. Then I diluted some oil paints (the kind that come in a tube) with thinner. I thin the paint down approximately 5 parts thinner to 1 part paint. I then brush this over small areas at a time. The wash brings out alot of the details that disappear in the solid white surface - especially the panel lines. Before it dries completely I wipe the excess off witha clean rag. After that dries I spray on another coat of dull coat to seal it.
This is the point when I like to use pastels to weather further. The pastels are ground down to a powder and you can apply them with a brush, sponge, Q-Tip, anything you like. The idea is to get the effect you want no matter what technique you use. It is really easy to get carried away when you're weathering so proceed slowly and refer to your reference photos often.
Remember, although you may be working on a fictitious vehicle you can still refer to real world things that you can use to apply to it. Looking at an old truck that has alot of wear and tear can inspire you to add things like oil stains, chipped paint, dents, burn marks, the list goes on. Using real world elements brings an added sense of realism to your work so look around and collect pictures.
Saturday, September 27, 2008
Time to Paint!
For the paint I wasn't sure which to use. Typically I use Tamiya model paint which I like alot especially when using it with an airbrush. When ILM painted their original models they used paint from a company called Floquil. Well, Floquil is still in business so I went ahead and ordered some paint and gave it a shot.
I started by spraying the whole model with Reefer White mixed with a little Gray. I let that dry overnight. The next day I lightly sanded the white with a very fine sand paper. Now it's time for the masking. There are alot of different stripes and marks on the XWing and there are a few different versions. I decided to go with Luke Skywalker's version - Red 5.
Alot of the colors may seem bright and pronounced at this point but they will become muted when I begin weathering.
Wednesday, September 24, 2008
Wings, Wings & More Wings
The wings include a few model parts but most of them I scratch built. It took alot of time especially the guns.
Here is a detail of the back of the engine. The part in the center is a heatsink.
When they were done I went ahead and test fit them onto the fuselage. I decided to keep the wings in the fixed open position.
Sunday, September 21, 2008
Canopies & Cockpits
Time for more "kitbashing" to fill up the cockpit. I used alot of parts from airplanes and some photoetched tank parts. By molding alot of the parts I was able to make multiple copies and repeat certain ones. I didn't really follow the original model I just made it look functional.
The canopy was the tricky part. It took alot of patience to get the shape just right. I started by making a mock-up in thick paper. When I was happy with it I used the paper as a guide to cut the styrene. To avoid the glare from the lights during shooting the original models didn't have any windows. I decided not to include "glass" either because I liked the way it looked.
Wednesday, September 17, 2008
Droids
After I was happy with the results I painted it and test fit into the space on the strip.
Greeblies & Silicone
With the mold ready to go I mixed up the silicone and poured it in. In order to avoid getting air bubbles from forming I placed the mold on the floor and poured from about 6 feet off the the ground. You have to keep a thin steady stream until the mold is filled so you have to get comfortable before you start pouring.
After the silicone cured up over night I removed it and began filling it with resin. I like using a 2 part resin from Bragdon Industries which is pretty easy to use and very forgiving. When I had the parts I needed I began filling in the "R2 Strip" according to the original model. It may not be 100% accurate but it captures the feel of the original.
Tuesday, September 16, 2008
Nose Cones & Styrene

After everything was covered I sanded it down using progressively finer sand papers. I usually start at 400 grit and go to 12000 grit. There's a great sanding pad kit you can get from Micro Mark with really fine grit. I like to wet sand because it keeps from heating the plastic while you're sanding.
To fill any seams I use Automotive Red Glazing Putty. You get a pretty large tube and it lasts a lifetime.
India Turns 3!
Sunday, September 14, 2008
Scratchbuilt Studio Scale X-Wing
I started off by blowing up pictures of the original studio model to approximately 2 feet long. I used pictures from what has become known as the "bible" of Star Wars models - "Chronicles". An expensive book but well worth every penny. From there I started with a block of balsa wood and carved it to shape.
I continued to refine the shape. I spent alot of time trying to get it right before I moved on.


